So, what is paint correction? I’ve been personally asked this a countless number of times over the last several years. Simply put, paint correction is the process of leveling a vehicle’s clear coat to remove imperfections from the surface. Eliminating swirl marks, random isolated deeper scratches, oxidation, water spot etching, and other surface defects that negatively affect a vehicle’s reflection. Oftentimes paint correction will enhance the overall depth and shine of a paint finish to a better than new state!
The term paint correction is somewhat new in today’s world of detailing, but is catching on quickly. The old school term of having your vehicle “buffed and waxed” is being replaced by the more sophisticated “paint correction & ceramic coating.” A fancier name for a more refined and beneficial process.
The technological advancements in the detailing industry have been considerable over the last 20 years or so. Especially when it comes to surface correction and protection. I know first hand how quickly things have progressed from my years as an owner/operator of an in-depth automotive detailing and surface protection business.
My goal for this article is to address any questions and concerns that you may have about the paint correction process. Here is an overview of what we will cover…
Disclaimer: This article is not intended to be a how-to write-up. I recommend having paint correction done by an experienced and skilled professional. The improper use of a machine polisher could result in permanent damage to your vehicle’s clear coat.
I want to start by providing a bit of education on the composition of modern day paint finishes. This will give you a better understanding of the paint correction process.
What is a paint finish composed of?
The majority of vehicles on the road today have a two stage paint finish, as opposed to the single stage system that it began to replace in the late 1980’s. We will be referring to the correction of a two stage finish for the rest of this article, but look out for a write-up on single stage paint in the future.
The two stage paint system is composed of a colored base coat that is topped with a non pigmented clear coat for protection, depth, and a glossy finish. The clear coat has added UV blockers that help to protect the base coat from fading/oxidizing. It also serves as a durable layer, shielding the base coat from light scratches and other defects.
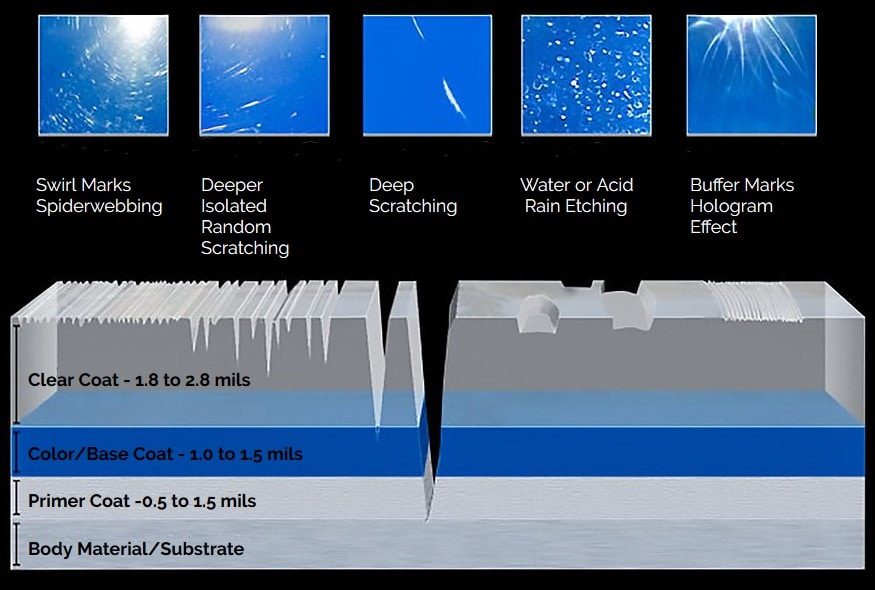
The properties of a clear coat will vary from one manufacturer to the next. According to Defelsko; a manufacturer of paint thickness gauges for professional detailers, the average clear coat thickness usually ranges between 1.5 – 2.0 mils (1 mil = a thousandth of an inch.) For reference, a Post-It Note is right at about 3 mils thick, so that means your clear coat is roughly half the thickness of a sticky note! You will see why this is crucial to understand as we continue on to explaining various types of paint defects and the methods used to correct them. Hence the term paint “correction.”😉
Common paint defects and why they are killing your paints reflection.
Illustration of the layers that make up a paint finish and the varying depth of common defects.
Does your vehicle sit outside in the elements, visit the automatic car wash often, or receive the occasional wipe down with quick detail spray? Chances are that your durable, but thin, clear coat is taking a beating! Look close and you are likely to find a vast amount of paint defects joining forces to dull the reflection of your clear coat.
Let’s take a look at the most common defects and the negative effects they have on your paint’s reflection.
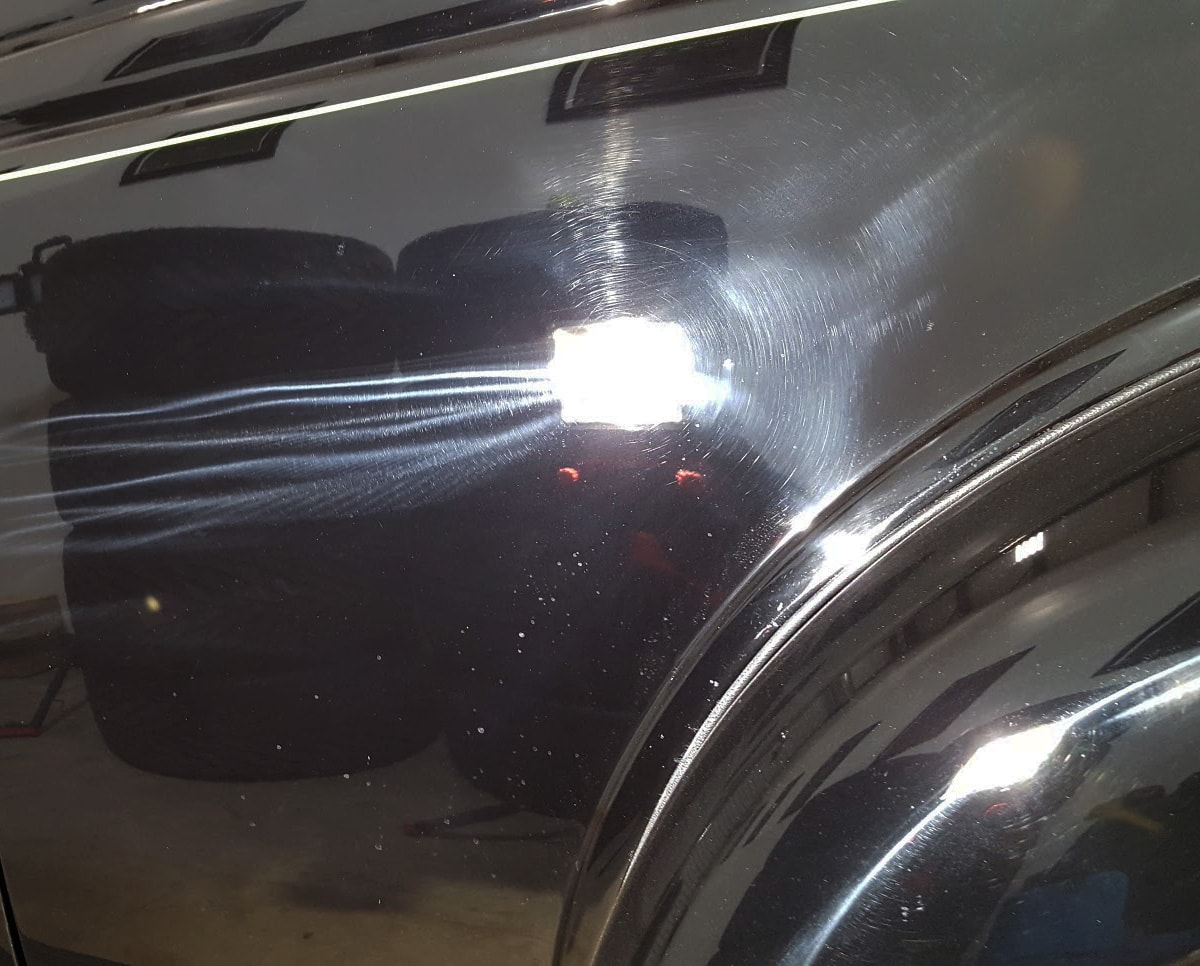
Swirl Marks
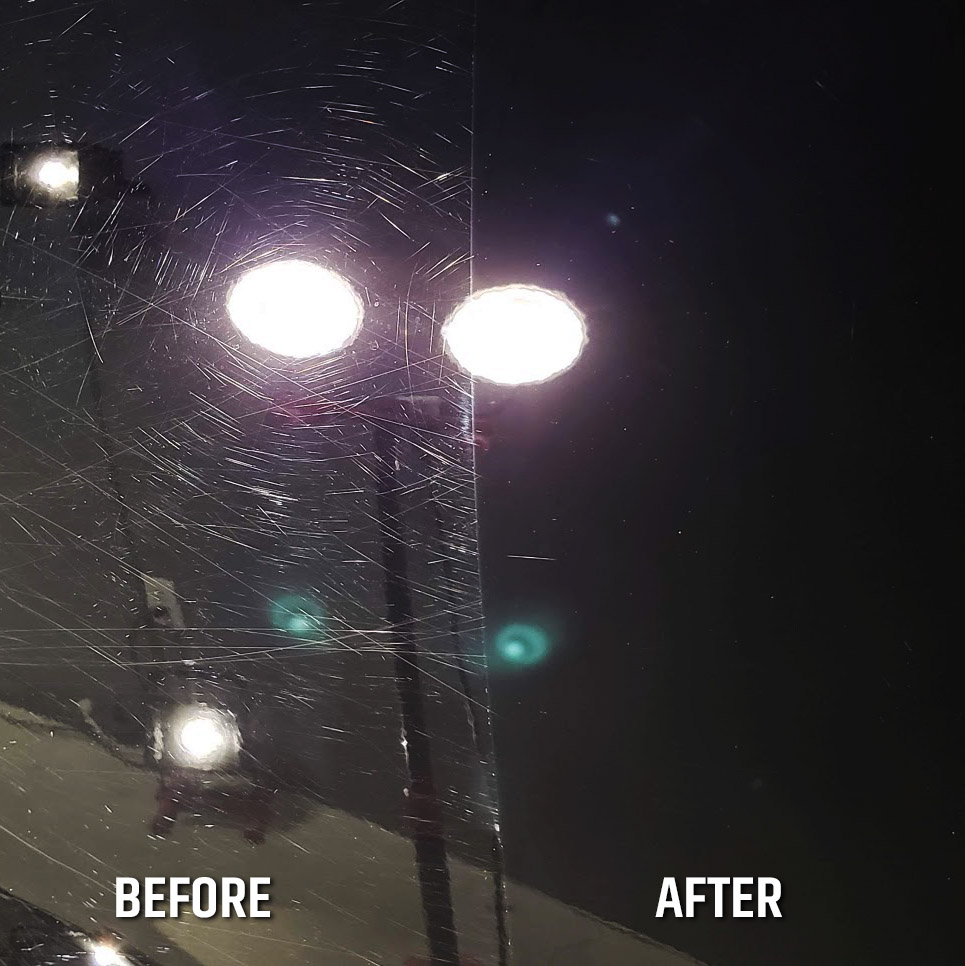
Reflection of swirl marks using modified LED lighting specifically for paint correction.
The first defect we are going to cover is generally referred to as “swirl marks.” These are a countless number of fine scratches covering the surface of a vehicle’s paint finish. When shown in the sun they produce a round, spider web like reflection. Swirls are the easiest defects to remove, but are often masking much deeper damage underneath.
The most common causes of swirl marks are from washing with a dirty wash mitt, using cheap microfiber towels, dry wiping, or the use of automatic car washes.
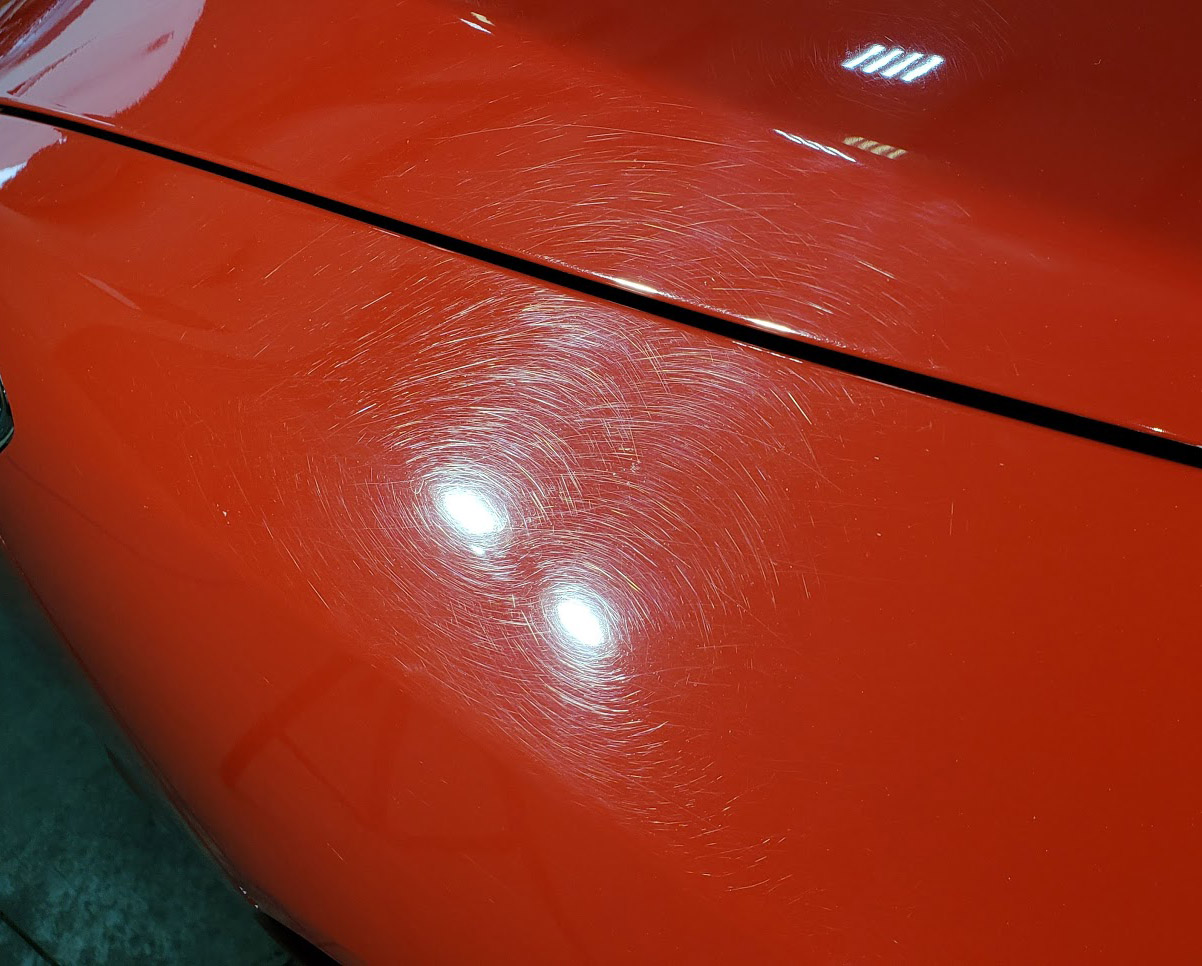
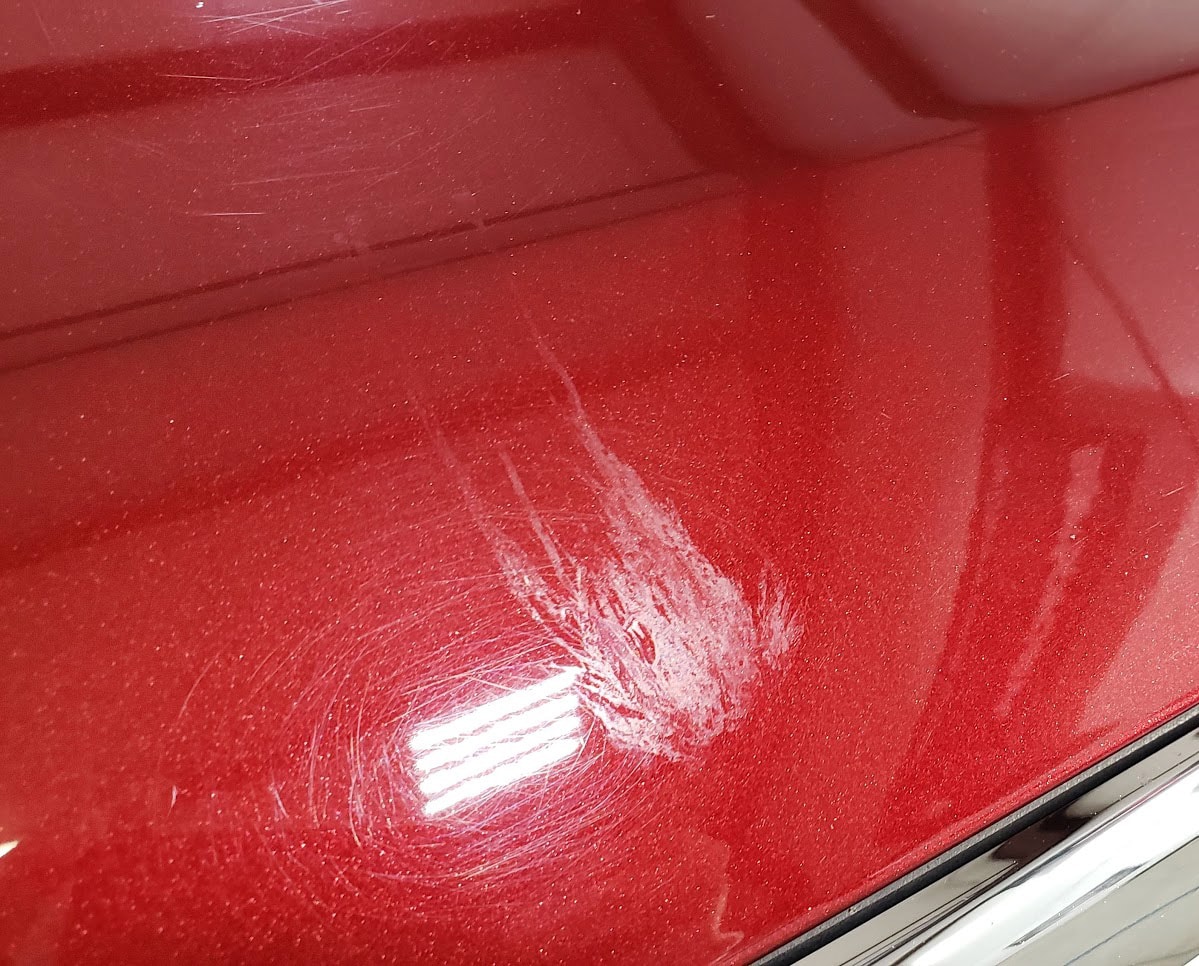
Random Isolated Deeper Scratches (RIDS)
Random Isolated Deeper Scratches (RIDS)
Random isolated deeper scratches (RIDS) are defects of different depths with no particular pattern. RIDS are usually camouflaged by thousands of shallower surface scratches known as swirl marks.
RIDS can be the result of normal wear & tear, the use of abrasive car wash brushes, or even a pesky little rock hiding in your drying towel. These scratches can be removed or minimized as long as they haven’t broken through the clear coat. (See image above.)
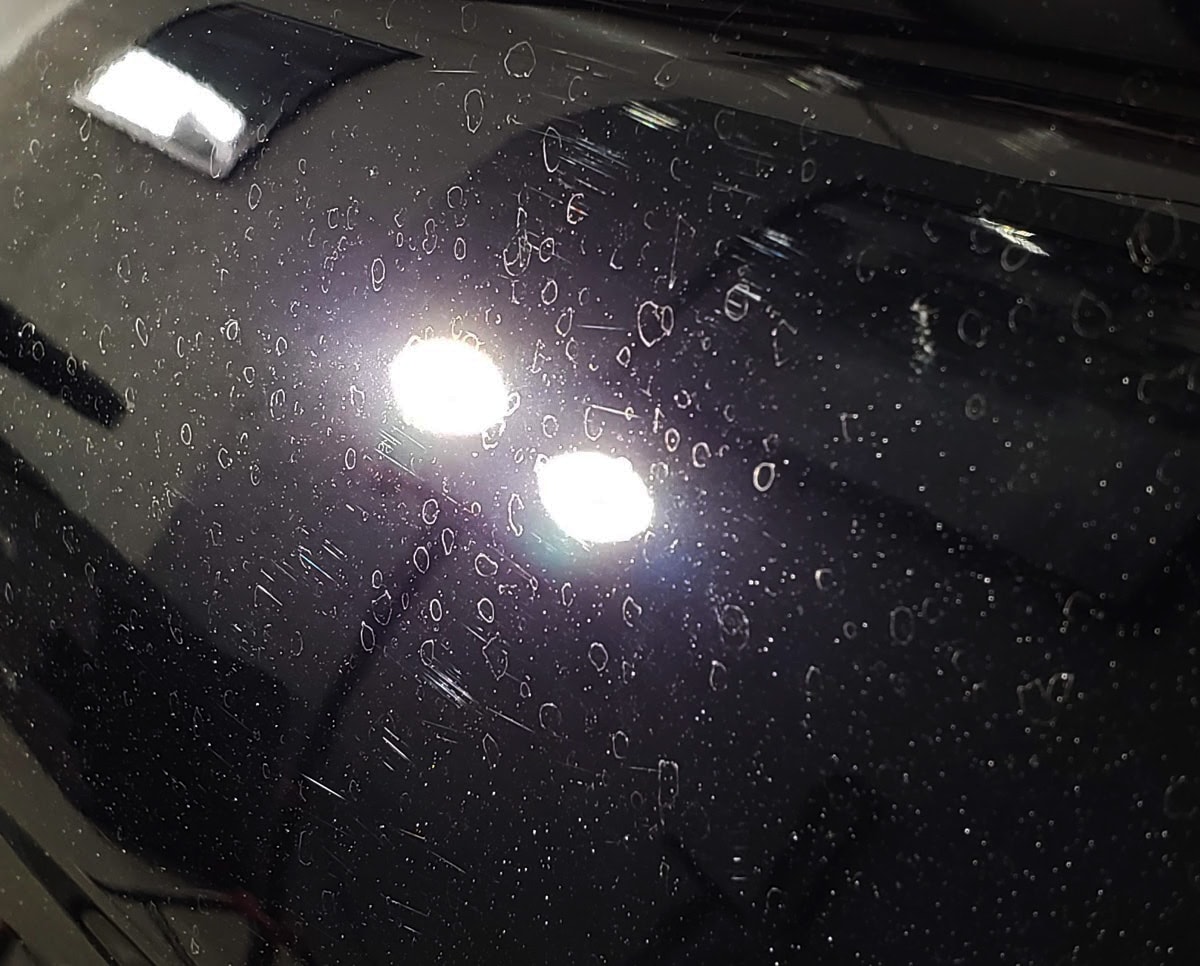
Etching
Some forms of common etching are cause by water spots, bug remains, and bird droppings.
Round etching caused by hard water deposits.
Water spot etching happens when the minerals found in ground water remain on the surface after evaporation. These deposits may etch into the clear coat and leave behind marks resembling the shape of the water droplets. (See image above.)
Etching left behind from acidic bug remains.
Bug etching appears when the acidic remains of dead bugs begin to eat away at the surface of the paint finish. (See image above.)
Bird droppings can be more than an eyesore on your recently washed ride! They can be very harmful to your paint finish if left to dwell for too long. Bird droppings contain a corrosive chemical called Uric acid. An acid strong enough to eat through a wax, sealant, or coating and etch into the clear coat. The damage from bird droppings will look similar to that of bugs. (See image above.)
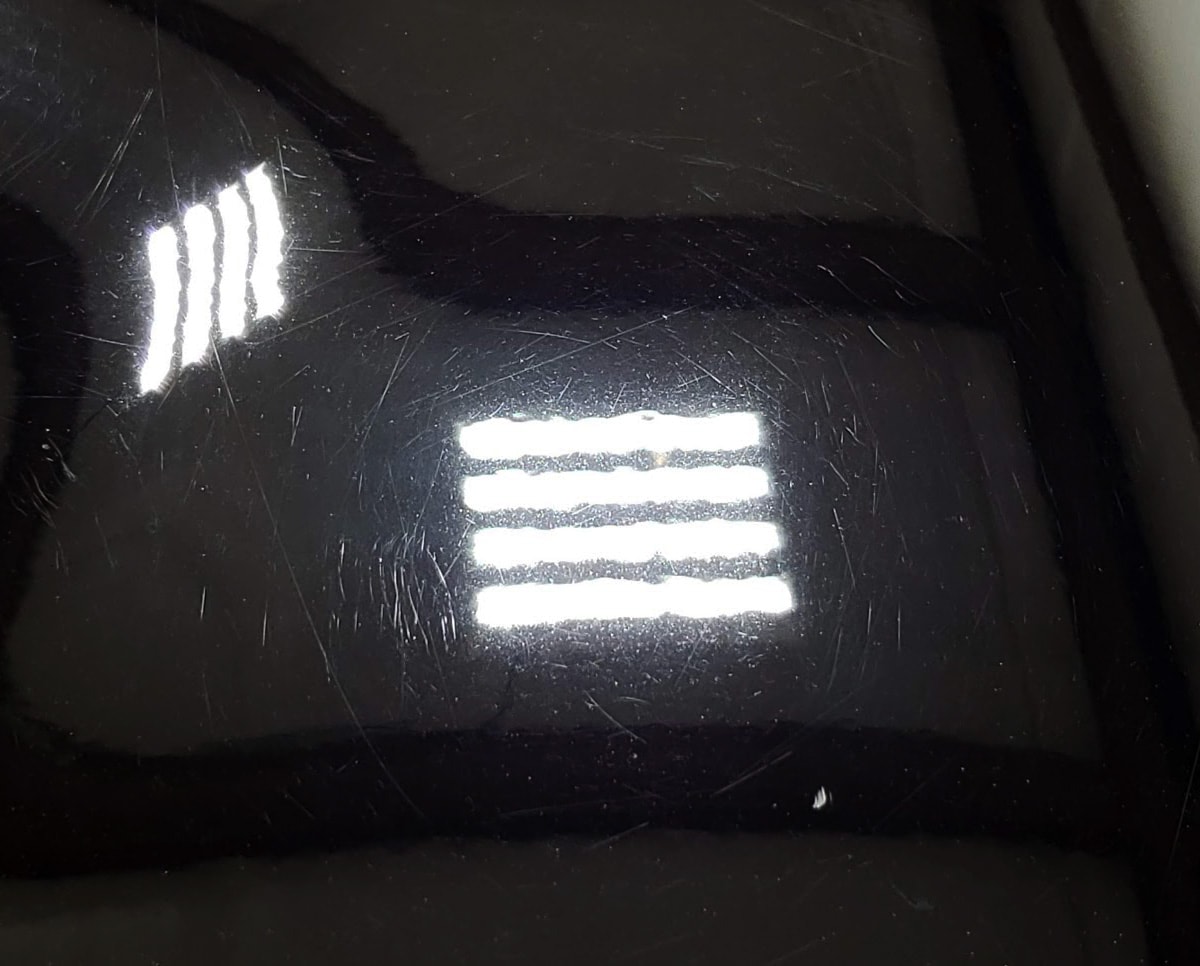
Buffer Trails & Other Paint Defects
Buffer TrailsBuffer Trails occur when a vehicle is incorrectly polished with a rotary polisher. This leaves behind unsightly circular holograms across the vehicle’s surface. These imperfections may be hidden by a cheap wax or glaze filling the defects until the vehicle is washed again. They are commonly found on vehicles that had a recent trip to the body shop or received a cheap “buff job” from an inexperienced detailer. (See image above.)
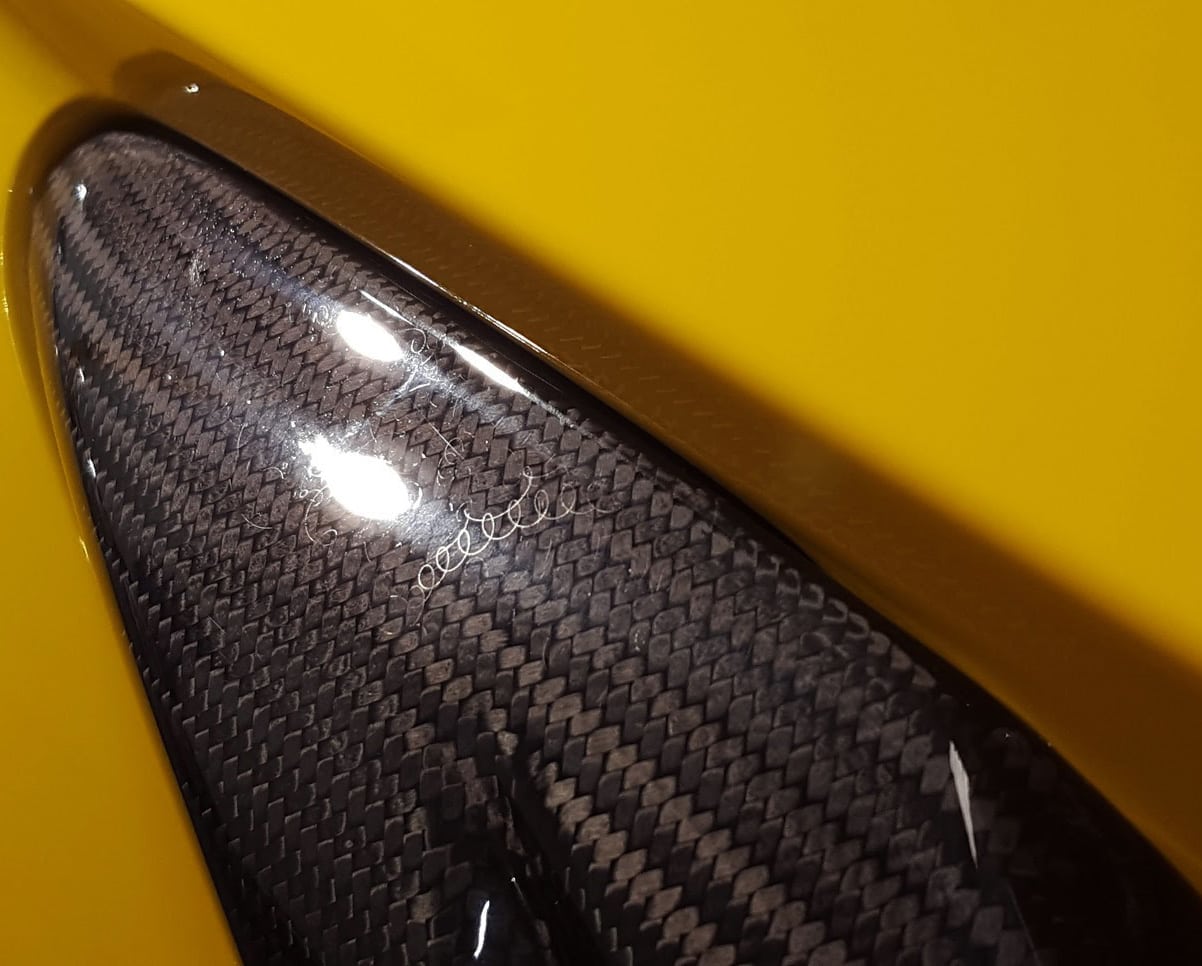
Sanding pigtails on a ZR1 Corvette’s carbon fiber fender vents.Pigtails are another type of defect you will find left behind by a body shop. These are small circular scratches that resemble the curliness of a pig’s tail. They are the result of a worn out and/or dirty sanding disk on a dual action machine and will vary in size and depth. (See image above.)
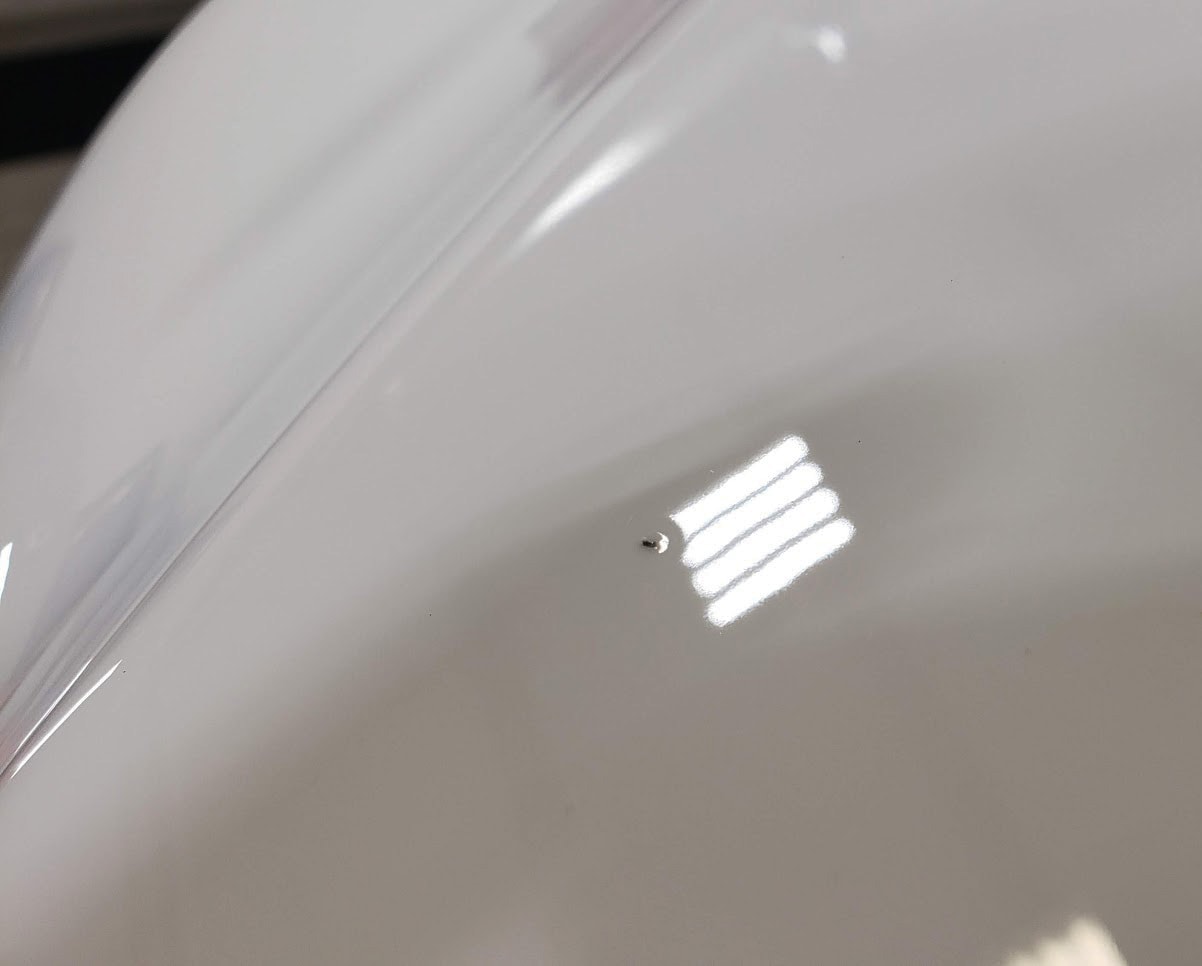
Trash trapped under the clear coat.Nibs/trash in the paint finish is last type of defect we will talk about. This happens when dust particles in the air land on the surface while the vehicle is getting painted. These particles get trapped in the clear coat requiring sanding for removal. (See image above.)
Let’s talk about removing those defects with paint correction.
Now that we have an understanding of paint composition and defects; let’s talk about the removal process.
As stated earlier, paint correction is the process of leveling a vehicle’s clear coat to remove imperfections from the surface. High speed machine polishers, pads, and abrasives are used to level down the clear coat around the defects. This diminishes the blemish’s visual impact on the finish.
This procedure actually removes a tiny amount of the vehicle’s clear coat, which will vary in hardness and thickness from one manufacturer to the next. These variables are important and should be considered before paint correction so that the correct approach can be taken. Some finishes can be corrected with a one step polish or compound, while others could require multiple steps to achieve the same results..
This is why it is important to have paint correction done by an experienced professional. Unless you are like me and choose to learn this process on your own vehicles and accept the risk involved!
Is paint correction safe???
Yes, when performed by an experienced professional that possesses the proper knowledge and tools to execute the work correctly. It is important to be able to assess the variables of different paint finishes, measure the amount of surface material, look for visual cues, and use the most conservative methods to reduce the amount of clear coat removal.
An inexperienced individual could cause more harm than good, by damaging or removing too much clear coat. A novice using a high speed machine with the right pad and abrasives can polish through the clear coat. This leaves behind an unattractive spot and exposes the base coat to the elements. The only solution is to repaint the panel.
That being said, paint correction can be performed many times over a vehicle’s lifetime, if done correctly and conservatively. Your clear coat has a much better chance of standing up to the test of time with proper care after paint correction, than it would if left neglected. Neglect allows those defects to compound over time and degrade the clear coat. This could ultimately result in clear coat failure.
The goal isn’t always a perfect paint finish…
Chances are that your vehicle is not going to be attending the Concours d’Elegance. This is an automotive competition held on the Pebble Beach golf course. Accepting only the finest, near perfect, automobiles from around the globe. So why should the integrity of your clear coat be risked chasing a perfect finish?
Your vehicle will likely need to repeat the paint correction process at some point in the future. So leaving plenty of surface material behind for that is the best practice. A proper and conservative paint correction will help to ensure clear coat longevity.
I’ve performed hundreds of paint corrections over the years. In my experience, anything above 80% defect removal will provide amazing results. Being conservative and not chasing absolute perfection will leave behind plenty of surface material for future polishing.
What about scratches that have penetrated the clear coat?
Unfortunately, there are times when a scratch is too deep to fully remove. Either the scratch has penetrated through clear and into the base coat or has come really close to doing so. There are a couple of methods to improve the impact that these scratches have on your paint finish.
Wet sanding can diminish the appearance of deep scratches by rounding off the edges of a scratch. This helps by not allowing the light to catch the edges and reflect back to your eye. After sanding, a machine polisher and compound are used to remove the tiny scratches left behind from sanding.This continues to soften the edges of the scratch, further decreasing it’s visibility.
Some scratches may be too deep and/or wide. These will need a few light and tedious applications of touch-up paint to help mask them. Once cured, the paint can be wet sanded and polished to blend in even more.
These methods won’t work for every occasion, though. Some scratches will be too severe and need conventional paint and body work to properly refinish the area.
What defects will paint correction not repair?
If your ride has clear coat failure, countless rock chips, flaking clear coat, faded base coat, or anything similar, it is best to consult a body shop. I’ve seen some miracles performed by detailers over the years, but there are some things that paint correction will not fix.
What to expect price wise for paint correction services?
I can only speak for my area in the southeastern United States, but generally you will be in the ballpark of $400-$1000+. It all depends on your particular vehicle’s needs and your goals. This is not factoring in protection costs such as ceramic coatings and paint protection film.
Safety
In case you didn’t heed my advice of hiring a professional, here are some tips to keep you safe during the process. 😜
Ear protection
Machine polishers are loud and can reach decibels that will damage your eardrums. Always use earplugs or noise cancelling headphones when polishing. I speak from experience! My ear drums have taken a beating over the years. No pun intended…
Mask
Trust me when I say that you do not want to be breathing in the tiny dust particles from the compounds/clear coat during the correction process. Paint correction can get dusty and messy! Your lungs will thank you in the future for protecting them! Check out RZ Industries for a variety of filtered masks that are great for paint correction.
In closing…
I hope that you now have a good understanding of what paint correction is, its benefits, and disadvantages. This process can provide stunning results when performed correctly, or leave you with a ruined paint finish when not!
Always do your homework before hiring someone to do this work. If you do decide to try it out yourself, I recommend finding an old hood, fender, or a friend’s junky ride to practice on. Not a client’s vehicle!
We will be publishing more info soon on the different forms of protection available for your paint finish and providing you with plenty of maintenance tips to keep it looking glossy and slick for years to come!


 So, what is paint correction? I’ve been personally asked this a countless number of times over the last several years. Simply put, paint correction is the process of leveling a vehicle’s clear coat to remove imperfections from the surface. Eliminating swirl marks, random isolated deeper scratches, oxidation, water spot etching, and other surface defects that negatively affect a vehicle’s reflection. Oftentimes paint correction will enhance the overall depth and shine of a paint finish to a better than new state!
The term paint correction is somewhat new in today’s world of detailing, but is catching on quickly. The old school term of having your vehicle “buffed and waxed” is being replaced by the more sophisticated “paint correction & ceramic coating.” A fancier name for a more refined and beneficial process.
The technological advancements in the detailing industry have been considerable over the last 20 years or so. Especially when it comes to surface correction and protection. I know first hand how quickly things have progressed from my years as an owner/operator of an in-depth automotive detailing and surface protection business.
My goal for this article is to address any questions and concerns that you may have about the paint correction process. Here is an overview of what we will cover…
So, what is paint correction? I’ve been personally asked this a countless number of times over the last several years. Simply put, paint correction is the process of leveling a vehicle’s clear coat to remove imperfections from the surface. Eliminating swirl marks, random isolated deeper scratches, oxidation, water spot etching, and other surface defects that negatively affect a vehicle’s reflection. Oftentimes paint correction will enhance the overall depth and shine of a paint finish to a better than new state!
The term paint correction is somewhat new in today’s world of detailing, but is catching on quickly. The old school term of having your vehicle “buffed and waxed” is being replaced by the more sophisticated “paint correction & ceramic coating.” A fancier name for a more refined and beneficial process.
The technological advancements in the detailing industry have been considerable over the last 20 years or so. Especially when it comes to surface correction and protection. I know first hand how quickly things have progressed from my years as an owner/operator of an in-depth automotive detailing and surface protection business.
My goal for this article is to address any questions and concerns that you may have about the paint correction process. Here is an overview of what we will cover…